Request Approval for Items
|
A request-based workflow places responsibility on the student provider to identify which parts of their work are ready for approval, to ensure they pass the required checks, and to correct all deficiencies prior to engaging faculty for approval. It pushes students to request approval for work done for the patient associated with the current appointment, maintaining the focus on the appointment currently in session. Important: A student provider can only make requests if they are set to use approval requests. When a student provider is ready to have work that was done during an appointment approved by a faculty member, they can use a specific clinical notification state to display the Approval Request window and request approval for the item(s). Important: Clinical notification states are only accessible within an appointment’s timeframe. This is set through a station option and defined as the period that starts x minutes before an appointment and ends y minutes after an appointment. The approval request workflow may vary depending whether you want to request approval for one or multiple items. With the changes to the warning/error checking timing, a variety of warnings/errors may display during the approval request process. Note: Some warning/errors only apply to certain item types. Examples: “Treatment was not start checked” can only display for treatments. To request approval for items:
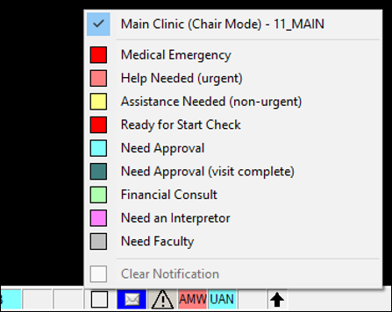
Example: Need Approval. Important: The selected chair and current date and time determine which patient name displays in the Approval Request window. For student providers that have appointments in multiple chairs, each chair displays the associated patient name at the top of the clinical notification states list. If you want to display the window for the other patient, select the other chair before you select the clinical notification state. Note: If you have another patient selected in axiUm, the selected patient changes to the appointment patient when you open the Approval Request window.
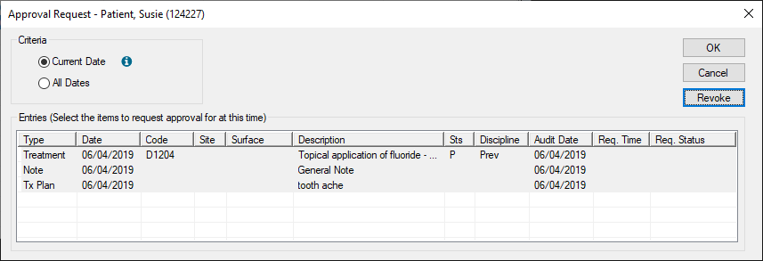
The Approval Request window displays and lists unapproved items for the current provider, date, and appointment patient by default. Note: All record types display listed in chronological order as they were added or modified.
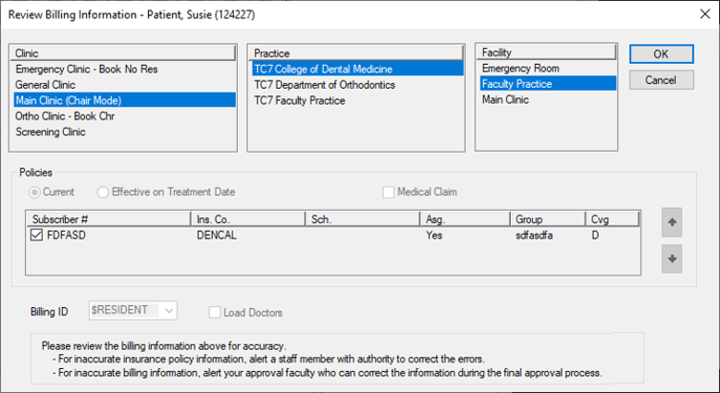
Note: Only unapproved items entered by or for the current user and patient display. This includes items that are pending approval. If applicable, any incomplete or missing work errors/warnings display. Examples: Missing patient consents, treatment forms, or start checks. Note: If an error displays, you cannot continue. If a warning displays, your institution’s workflow determines whether you continue the request or stop to finish the work. If stopping, you can request approval after the missing/incomplete work is finished. If no errors and/warnings display, or you choose to continue past the applicable warnings, the approval request process continues. If you selected any P/I/C treatments, the Review Billing Information window displays with the Clinic, Practice, Facility, Policies, and Billing ID fields defaulted. Note: If edited or deleted treatments are selected, the window does not display.
Important: The fields in this window are read-only. Review carefully for issues and alert the appropriate staff member or alert faculty during approval if necessary. Important: If you click Cancel, a warning displays, cautioning you that the approval request will be cancelled for all items you have selected. You can click Yes to cancel the request or click No to continue with the request. If the approval request is sent successfully, the Approval Request window closes. The student may now contact a faculty member to approve the items or, if your institution uses the Operatory Monitor, faculty members can review it for new requests.
|